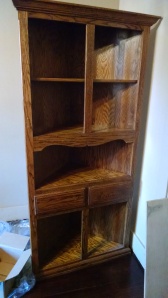
Sometimes, you find the perfect piece, the thing that is EXACTLY what you need. Almost.
Oftentimes, we get pieces for our house on Craigslist. It’s a great resource for people like us who are looking for unique, old pieces to fit in with an older home style (also – bonus – it’s cheap). However, that also means that you can’t go, “Does that come in a different color?” You have to deal with what you have sitting in front of you.
Such was the case with this piece. A Craigslist find that was just the corner cabinet for the kitchen that we were looking for! It was more modern, but still surprisingly well made, solid, and heavy. A great buy at $50. That being said, it also had the classic 90’s golden oak with brassy finishings.

The glass fronted windows, while leaded with a brassy metal, were actually beautifully made. The detailing was physically deeply etched into the back of the glass, not painted on. It was really a very ‘old’ way of doing things.
I had been wanting to try a project like this for a while – something that is in great condition that doesn’t really need changed or fixed, just tweaked a little. So I Googled around a bit to see what we could do to darken the wood tone. Turns out, with finished furniture, it’s much like dyeing hair. You can always go darker but you can’t go lighter without stripping it. We wanted the cabinet to match the wood tones in the kitchen (dark red cherry and mahogany colors), so we had a few options.
Luckily, I decided to actually test out this project before going ahead with it (I’m usually too impatient for that), because it turns out the different techniques have quite different outcomes.

Pictured: upper left – Minwax Polyshades applied with a brush, upper right, Minwax Polyshades applied with a soft cloth, and below, an attempt at re-staining on top of existing stain.
In this case, we decided on Minwax Polyshades in Bombay Mahogany, satin finish (on Amazon.com). Warning – I had attempted to use this product on another project and it was awful. Always test before using! It worked out much better this time.
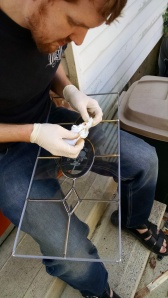
In addition, Dan ran down to the stained glass store around the corner (yeah, we have one of those around here apparently), to see what could be done about the brass on the glass doors. They had a product called JAX which chemically oxidizes the surface of the metal to give it a different patina. We used the pewter black option – this stuff:
It’s just a rub on/rub off sort of product, so it’s not too difficult to use. Here you can see the difference it makes:
Here’s Dan applying it:
After two coats of Polyshades, touching up the window metal, and some new more period appropriate hardware… TADA!
Glamour shot of the new hardware – we specifically chose handles that went with the floral pattern on the glass, and that echoed the art of the groundbreaking Arts and Crafts artist Charles Rennie Mackintosh (read up on his work – especially his famous rose patterns – on Wiki).
And check out how it goes with the floor in the future kitchen! Before:
And after:
For the relatively low amount of effort that we put into this project, it turned out to be much more satisfying than we could have imagined.


[…] – my handy dandy old friend, Minwax Polyshades (remember it from this post? https://veronahome.wordpress.com/2014/10/10/red-up/). It’s worth noting again – Minwax Polyshades does NOT work on everything. Please test […]